Fabric Box
Level: Easy
I imagine that boxes have always been used to store things, but boxes are
now used as a decorative accent in many room decors. That doesn't mean they
can't still be used to store things though. Think of all the little worldly
possessions that you can stash away in these wonderful covered boxes. I think
you'll find that this is a fun project for all ages.
Supplies:
box
fabric
heavy weight white glue
scissors
batting/fleece-optional
Step-by-Step:
Boxes will add to the finished look of a bedroom because you can coordinate
colors and fabrics in the room. You can use some of the left over fabric
scraps from the drapes, upholstery, or a dust ruffle. Let your creative juices
flow and combine all those wonderful fabrics you have used in the room.
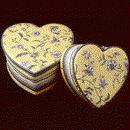
I used striped fabric from the dust ruffle. Any box can be covered but it
must be a rigid, sturdy box that will hold its shape. I found heart shaped
boxes in two different sizes at the local fabric and craft store.
I wanted these boxes to be soft so I started by covering them with a layer
of fleece and/or batting that a quilter or crafter would use. Lay the lid
of the box on the fleece and trace around it to get the shape for the top
and the bottom of the box. Measure all around the sides and cut a strip to
wrap around the sides.
Lightly glue these fleece pieces in place on the box. Begin by covering the
bottom first. That way you can practice in an area that will not show before
working to the top that show.
Trace around the bottom again as you did before but this time allow an extra
inch to overlap on the sides. If you are covering a round or heart shape
box, it will be necessary to cut slits around the curves to eliminate the
fullness when you glue it in place.
Once the bottom piece is glued in place, measure and glue the side strip.
Again, allow an extra inch for a fold at the bottom edge of the box and an
extra inch to fold over the top of the box toward the inside of the box.
The strip can be from the straight grain of the fabric. This is where a stripe
fabric can help you cut and fold straight. On this strip of fabric for the
sides, press the bottom inch up with an iron before you glue it in place.
This folded edge will cover the overlap from the bottom of the box. The top
edge will be turned over toward the inside of the box and then glued in place.
If you were covering a heart shaped box I would start by attaching the side
strip at the dip of the heart. A narrow turn down at the end of the strip
will finish it nicely and prevent raveling of the fabric.
Use a heavy weight white glue so that it doesn't saturate the fabric and
bleed through, which will dry as a stiff hard piece of fabric. Hot glue is
not recommended for this job.
The inside of the box needs to be finished in the same way so that when you
open it you see something pretty and finished. You can use a different fabric
that coordinates with what you put on the outside. Glue the interior fabric
much like you did for the exterior of the box. The only difference is that
you'll put the folded and pressed edge of the strip to the top edge of the
inside and overlap on the bottom slightly.
Then cut a piece of shirt cardboard the size of the bottom of the box. Cover
that piece of cardboard with the fleece and then the fabric and slip it into
the bottom of the box. It should fit snuggly in place and cover all the overlaps
to create a beautifully finished box. If you need to hide any glue joints,
add a lace or trim used for lampshade edging. It can be glued in place and
hide any problems on this cloth-covered box.