Basket Liners
Level: Easy
Can bread be served without a basket? The accepted way to serve bread on
the table during a meal seems to be in a basket of some shape or size. Most
of us either line those baskets with a hastily grabbed napkin or a paper
towel or even a clean tea towel. Why not make a few basket liners to fit
the baskets you use most often and then you don't have an oversized thing
which makes finding the rolls or slices difficult at times.
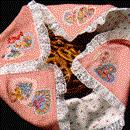
Make it two sided so that when the contents are opened you see another pretty
fabric instead of the backside of the main fabric. Using a gathered lace
or edging will add to the look and presentation of your basket of hot bread
or rolls (or pretzels). Using a liner also keeps the crumbs from falling
through to your table and making for a messy clean up job.
Supplies:
Two washable fabrics (sized to desired basket)
Thread
Scissors
Lace or Trim (enough to cover edge)
Step-by-Steps:
1. Measure the width, length and depth of your favorite bread or snack basket.
2. Allow for some overlap to keep your bread or rolls covered and warm. Add
a 1/2-in. seam allowance when deciding the size of the pieces to cut. I would
cut from a piece of paper and try the shape if you are doing other than a
square. Since bread comes in various sizes you might have baskets in various
shapes, too.
3. Cut only one piece of the coordinating fabric from the paper pattern or
the measurement you determined.
4. Measure around the perimeter of the shape to find the amount of lace or
trim to purchase and add 2 in. for every corner you go around in the sewing
process.
5. Baste the lace around the edge of this shape with the gathered edge on
the seam allowance and the lace or trim facing toward the inside of the napkin.
Neatly overlap at the beginning and ending of the lace or trim. Don't begin
or end the lace at the corner of the liner. Starting and finishing along
the edge makes it less noticeable.
6. Don't cut the lining piece to size until you sew around the edge of the
piece with the lace attached. Lay the piece with the lace or trim with the
right sides facing the lining fabric and carefully pin these fabrics together
around the outside edge along the seam line. If the lace is gathered it will
cause a bulge along this edge and that is why you don't want the lining piece
cut to size until later after you sew them together. At the corners pin the
lace flat and clear of the corners so that it doesn't accidentally get caught
into the seam as you round the corners when sewing the two layers together.
7. Beginning along one edge (not at the corner) sew these two pieces together
using a 1/2-in. seam allowance. Leave about a 4-in. opening for turning right
sides out. Stitch on top of the basting thread used to attach the lace.
8. Carefully trim away the excess fabric at the corners before turning right
sides out.
9. Press the edges flat and then top stitch around the edges very close to
the pressed edge or lace.
10. Any applique could be added to the top piece before construction begins.